Daily inspiration

IMG_20170904_203540_587 - CopyMonotony. We certainly need to strive hard to break it, constantly. There are so many things that can stress you out. Sometimes, you can’t stop thinking about how things could be better. But, then, you have to let go of your worries, and start breathing; once again.

As a homemaker, and, now, as a freelance writer, I have to find joy in every household chore. Cooking, however, is something that takes a lot of my mental work. ‘What should I cook today?’ is the question that kills my mind every morning. I do enjoy cooking; and when I don’t, I feel that something is missing; but, cooking, as a daily chore can be extremely monotonous. And, many a time, I fail to live up to it.

And, come on, I can’t be making pasta, hot and sour soup, Japanese-style salad or a chia seed drink daily to feel better. I have to face the veggies! Before preparing every meal, I see the veggies in the fridge and find none of which I feel like eating. Creativity and veggies hardly go hand in hand during the week, for me, at least.

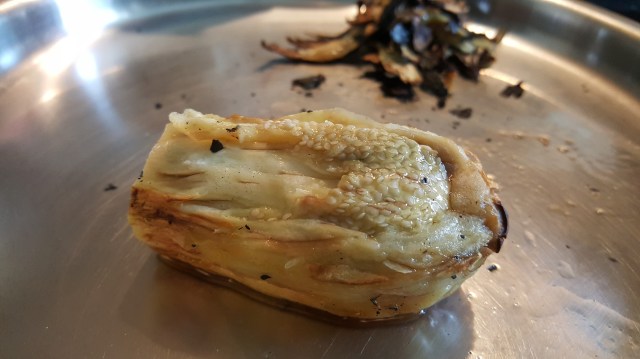
Nonetheless, when you play with textures and flavours, you can, I believe, break the monotony. We never got new items to eat every week in my mum’s kitchen. But, still, almost all the dishes that she made, had us kids drool them. Like this Mirchi ki sabzi.

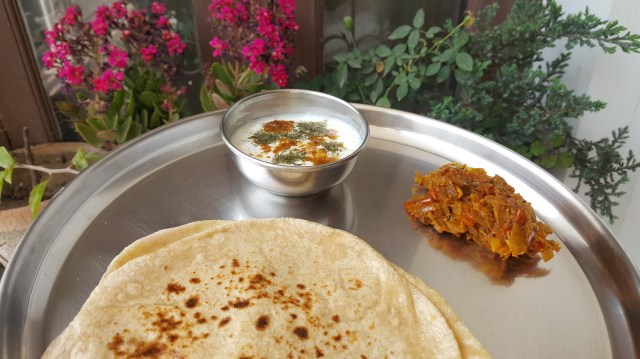
It looks hot, but it isn’t. It is tangy in taste and soft in texture (can be mashed easily) and goes perfectly with my roti or rice. What I really like about it is that it doesn’t go stale easily. So, I always end up enjoying it the following day also. I can imagine, in a climate like that of Jaiselmer’s, this dish fits aptly.

Till date, I haven’t been able to crack my mum’s exact recipe, but, that said, I’m not afraid of trying it again an again. So, the next time you see these green chillies in your vegetable market, add some in your cart/basket as well. I hope you try this recipe, and feel a little better about the ‘daily cooking’ process. Remember, we have to constantly break the monotony, or else. Well, or else, you might end up picking up the phone and making the food orders ever so often. What do you think?

Recipe: Mirchi ki sabzi (green chilly sabzi)

Ingredients

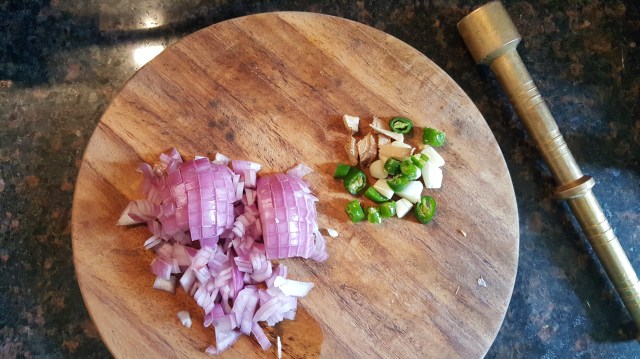
7 to 10 green chillies (these are thick and long green chillies that are milder than the small ones; don’t mix them with fat green chillies that we use for mirchi pakodas)
1 tbsp sesame seed powder
1 tbsp coriander powder
½ tsp mango powder (optional; I didn’t use it in my recipe)
2 tsp peanut oil or any oil
salt to taste
2 tbsp cream or homemade malai, you could use milk if you don’t have fresh cream (use this only when you think that your chilly is too spicy)
½ tsp cumin seeds (optional)
2 pinches of asafoetida
¾ tsp turmeric power

Method

1. When you buy your green chillies, wash them and make sure all the water has dried up before you make this sabzi. Now, chop them and throw them inside a strainer. Make sure there is a plate below. You basically have to remove the white seeds inside the green chillies; so, you can keep moving these chillies lightly in the strainer, so that the seeds separate.
2. Now, heat oil in a small skillet. Add the asafoetida, cumin seeds, turmeric powder; stir for 2 seconds and add the chopped green chillies. Make sure the heat of the stove is not on high. If I don’t pay attention, I end up coughing.
3. Stir it for a few times till you see the chillies more than half cooked. Now, add the spices and salt. The coriander and sesame seed powders are the winners of the dish.
4. Once you stir in the spices and let them cook for about 3 minutes, add a tsp of malai or cream. This will soften the texture and reduce the heat of the chillies as well. But, remember, if you add malai or milk, your sabzi won’t last long.
5. After about 3 more minutes of stirring, switch off the flame. I usually have this with hot whole wheat or sorghum rotis.

Beat the blues

IMG_20170622_003600_210

Recently, I got a chance to visit London, which I happens to be the most beautiful city I have ever been to. I was there for more than two weeks, and eating outside food for this long was not in my plan. So, one day, being tired of all fancy food, I craved for a simple raita. But, I only had the store-bought yogurt with me, which is something I loathe. Can I possibly be making a yum Raita out of it? I asked myself and went ahead anyway.

Pyaaz ka Raita is one of the dishes my mother is famous for in our huge community. This recipe goes back to the days when she used to live in a desert in my maternal home. Pyaaz ka Raita was made with fresh curd and chopped onions, and it hardly took any time to cook. Which is why, it used to be made a lot in the house. And it tastes yum. So, it wasn’t like anybody was adjusting with it.

For me and my brothers, this Raita is what our home is all about. After returning from a family trip or at the end of a long day when all feel tired, it is this recipe that comes to our rescue. Even in those busy Sunday mornings when a guest kept us busy, my mum manages to cook this Raita and impresses one and all.

So, the next time you’re clueless in the kitchen, tired of the colourful veggies, need something simple and tasty, you know what to cook. You will thank my mother for this one, I promise!

IMG_20170622_003656_082

Recipe: Pyaaz ka Raita

All right, so I generally make this Raita in an earthen pot that I got from Dastkar exhibition (Delhi). When I cook this way, it comes out to be nice with a great texture. You can cook this in a mixed metal skillet as well. We don’t use non-stick pans, and I hardly connect with them so you could avoid them too. Do I make sense?

So, first, we will cook the onions on high flame with the spices. In fact, my mum just adds the onion with the spices and tosses it a bit. You don’t need to cook the onions till it’s completely soft. You just need to mix the spices and let it be crunchy.

The second step is to add the slightly beaten curd. This is a quick process. You see, it took me quite some time to crack this dish. It is simple, but there’s this one rule.

Cook the onions on high flame. Add the beaten curd. Switch off the flame. Transfer the Raita in another pan. Cook the onions on high flame. Add the beaten curd. Switch off the flame. Transfer the Raita in another pan. Cook the onions on high flame. Add the beaten curd. Switch off the flame. Transfer the Raita in another pan.

This way, you will get a Raita that has crunchy onions, and because you transfer it into another vessel, it won’t curdle. So, are you ready?

Ingredients

½ tsp cumin powder
a pinch of asafoetida
¼ tsp turmeric powder
½ tsp red chilli powder
fresh curry leaves (I didn’t have it when I clicked the picture)
salt to taste
oil for tempering the spices
¼ tsp black sesame seeds
1 big onion, chopped
2 green chillies, long-slit or chopped
coriander, chopped
½ tsp coriander powder, optional
1½ cup curd (I use homemade curd that is fresh and lightweight, but you could use those tight/stiff/thick looking store-bought yogurt that comes in a plastic box. Though, I avoid those completely)

Method

1. Add oil in a skillet. Add the curry leaves, asafoetida, turmeric and red powder, cumin, and sesame seeds, and green chilies. Sauté it for 10 seconds and add the chopped onion. Remember, the flame is on high.

2. Add salt, coriander powder and sauté for a minute.

3. Now, add the beaten curd and chopped coriander leaves. Stir it ever so quickly and transfer the whole thing into another bowl (in room temperature). This will give it a nice texture. Voila! The Raita is ready!

My mum serves it with roti, jowar ki roti (sorghum) or bajre ki roti (pearl millet). In the picture, you can make out a thali (prepared in last winter). To keep us warm, we keep having bajre ki roti and lots of jaggery in the colder months. With this type of roti, I like to have lots of clarified butter or ghee as well. During summers, you could have this Pyaaz ka Raita with crispy jowar ki roti (it’s gluten-free, rich with nutrients and my mum keeps sending me a small bag of it every couple of months so that I’m never out of it.)

I hope, this Raita helps you beat the blues that might hit you when you are stuck in a weird situation, a clueless dinner prep time or after an uninspiring day at work.

No looking back

DSC_0298 - Copy - Copy

I never used to cook much when I lived with my parents. After marriage, it was just me and my husband living together in Mumbai. My in-laws lived in a different state. So, there was no fear in my mind as such to get up early and prepare the tiffin on daily basis. 

One day, my mum gave me strict instructions over the phone. “Get up early. Take a bath. Say your prayers and ring the bell in the temple (present in the house). And then start cooking,” she said. The time was set. The lunch-box had to be ready by 8 AM as that’s when he left for work.

So, there I was, up at 5.30 AM, hell-bent on doing exactly what my mother asked me to do. I entered my kitchen only after doing all the three tasks. Rang the bell in my makeshift temple (felt heavenly). Washed my hands, and went near the basin to pick up the spinach leaves I kept the previous night to cook. The best part was, I did everything on time. Presently, the time was 6 AM sharp. And I saw an ant attack on my spinach leaves! The tiny warriors ran on the plate and I didn’t know what to do. So, I sat on my kitchen floor, and carefully, started separating the ants from the huge bunch of leaves.

I was extremely precise in separating them both ants and leaves. Slowly and steadily, I reached a level where my plate started weighing a bit lighter. Sometime, in between, my husband entered the kitchen and made himself a glass of Bournvita. “That’s okay, baby. I’m leaving for work,” he said. I, on the other hand, was in state of horror to push the million ants away from my spinach leaves. “I’m sorry. It’s such a mess here,” I responded, irritably.

And guess what? When he returned home in the evening around 6 or 7PM, I was still cleaning the same bunch of spinach leaves!

The following day, after the spinach and ant episode, I woke up in the last minute and prepared the lunch in my night-suit, gave the lunch-box to him and went back to complete sleep, while my husband went off to work. And that became my routine.

Well, now you would have guessed my speed when I started out working in the kitchen. I was damn slow. Things just registered late in my mind. Month after month, you could see my experiments with measurements going haywire, and I had to learn a lot from my mistakes. 

I have a passion for reading magazines, and it was in Marie Claire India magazine (discontinued now), in which I spotted the recipe of Amritsary Choley. The magazine used to carry beautiful photo essays, and I tore this particular page that comprised a chef’s recipe of it. In the big photo on that page, there was the holy Golden Temple, and in a small shot, you could see a bowl of Amritsary Choley. It was written in a simple language, and it just clicked to me that the recipe could be the path breaker for me as a home chef.

dsc_1342

So, I tried the recipe on one of the weekends, and loved it to the hilt. It’s rare when you make something that looks similar to the recipe’s original photo. And I was happy!

When I went to Amritsar, after a few years, I realised the flavours of the city’s local food items are not just magical, but inspiring as well. You start believing in good food, and good life. And when you can create an enchanting recipe at home, it does feel special.

And when it comes to my kitchen skills, I’d say, there is still a lot of scope of improvement. But, hey, it doesn’t matter more than one’s love for good food. Right? 

Recipe: Amritsary Chole with Ajwain Atte ki Poori

Ingredients

¾ cup – chickpeas (soaked overnight)
1 onion – finely chopped
1½ tomato – grind into paste
1 tsp – ginger and garlic paste
2-3 – dried red chillies
1 tsp – carom seeds (star of the dish)
1 tsp – cumin seeds
2 tsp – coriander powder
½ tsp – turmeric powder
1 tsp – red chilli powder (totally depends on your preference)
salt to taste
1½ tbsp – ghee
1½ tsp – chana masala (store-bought)
a few pinches – garam masala
a few pinches – anardana (for sour taste) OR tamarind pulp
For garnish

Coriander leaves – chopped
Ginger – finely cut, length-wise
Green chillies – as per your wish

Method

  1. Soak the chana or chickpeas overnight.
    2. Take the chana in a pressure cooker, add water, a tsp of ghee and turmeric powder, and close the lid. Give this 5 whistles, and then keep checking if the chickpeas have cooked properly or not. Keep the boiled chickpeas aside. Make sure there isn’t too much water, because we want a thick consistency, and not a runny one.
    3. I use a cast iron skillet to make my choley dark. So, in a cast iron skillet or kadai, add the ghee, turmeric powder, carom and cumin seeds, red chillies, and let it crackle for a few seconds. Now, dump in the chopped onion and ginger-garlic paste and start sautéing it.
    4. Now, add in the tomato paste, the spices, salt and sauté for a few minutes. You want the paste to become thick, but make sure that it doesn’t stick.
    5. Once the mixture is cooked well, add in the boiled chickpeas.
    6. Add some water, and let it boil for 10-15 minutes on low flame. Cover it with a lid, but keep checking in between.
    7. Once done, serve it with hot and fluffy pooris, and don’t forget to garnish. You can also serve some sliced raw onions, green chillies and lemon wedge to go with the dish.

Note: The last time I added anardana in this dish, I could take its hard texture in my choley. So, make sure you don’t add too much of it.

Recipe: Ajwain Atte ki Poori

Ingredients

whole wheat flour
2-3 pinches of salt
1 tsp carom seeds
1 tsp oil

Method

Mix all the ingredients, and make a tight dough. Make small balls, roll a ball into a small round shape, and fry it in oil. As you dip one in the oil, press it with the frying ladle from all sides to allow the poori to puff up. Make sure the flame is medium to high, and not low.

Coconut diaries

IMG-20160228-WA0009For the longest time, I wondered how can I prepare coastal food in my kitchen. I know, this majorly covers sea food, but I wanted to try vegetarian coastal food. What were the options I had? Coconut is one such ingredient that is hugely consumed in coastal regions. And I started to get a few ideas. I still remember the first time I smelt cold-pressed coconut oil. Its aroma took me back to the sea, for some reason. And, so does grated coconut, that I use in my cookies. And, so does coconut milk for that matter.

My sister-in-law, who lives in San Francisco, recommended Thai cuisine to try, a few years back. Those were our early marriage days, and we never turned down an opportunity to step out of the home. So, we went somewhere at Palladium mall, in Lower Parel, Mumbai, and tried this cuisine. At the restaurant, I found the Thai Green Curry somewhat appealing, and somewhat bland. I knew I could make a better version of it. It was just a matter of convincing myself to do so.

Last year, I got my hands on a can of coconut milk at a gourmet store, here in Gurgaon. And I thought of the options, and, I put it back at the store’s rack. Later,  we went to a nearby Thai restaurant. It was jam-packed and meanwhile in the queue, we saw the menu card kept at the entrance gate. The prices made me think of that can that I left at the gourmet store, and I thought, it would be much better for me to try this green curry at home. We were no more that newlywed couple, and being at home seemed far more appealing to us. And, the restaurant didn’t seem to go empty anyway.

So, there I was. Looking at this can of coconut milk, and thinking, can I do this? I finally took the plunge to cook some Thai Green Curry myself. Quickly, I google-ed the recipe, and purchased the ingredients, and went home.

The process looked a tad bit long when I stood inside my kitchen with the bag of ingredients. “Please help me cook this dish,” I said to my husband. He was hungry, and so helping me make this dish was the best option he had. And then he went on with the list of ingredients. I chopped the veggies and herbs and did exactly what he said. I was way too doubtful and tired, when I reached the middle of the cooking process, if I can say so myself. But, it did give me a break from local flavours. For once, preparing something exotic excited me. Just when I added the coconut milk in my skillet, I knew I’m going to love this recipe. Which I did.

Last weekend, I prepared this Thai Green Curry again. Though I twisted the dish a bit with whatever was available in hand, it turned out to be good. And filling to the hilt. This nutritious curry tastes amazing, all thanks to coconut milk, the star of the dish. Although the whole preparation does need a bit of patience, as the ingredient list is long, I know it’s a matter of practice. All that said, the one thing I’m sure of is that I’m going to use coconut milk more often!

By the way, I have got a new job, and I’m finding it fulfilling too. What about you? What’s that one thing in your life that makes you feel accomplished?

Recipe: Thai Green Curry

Okay, so here’s a confession. I didn’t use all the ingredients mentioned in the usual recipes of this dish. Below is my version of it, where I have used a few local ingredients instead of the exotic ones. There are three basic steps to cook this dish. One, is making a paste in the grinding jar. Second, boiling the veggies and collecting its stock. And third, cooking it all with coconut milk. Lastly, it’s not compulsory for you to get all the ingredients. If you have coconut milk and a few veggies an herbs, you can go for it.

For the green paste
2-3 green chillies
1 tbsp coriander powder (or seeds)
1 tsp ginger, chopped
1 tsp dark soy sauce (optional)
a handful of basil leaves, chopped
a handful of coriander leaves, chopped (this will give a nice green colour)
3-4 lemon leaves
1 onion, roughly sliced (optional)
salt to taste
3-4 tbsp coconut milk or water

Veggies (cut them as you like it)
red capsicum (for the lovely colour)
green capsicum
broccoli (clean it well, cut it and soak in hot water for a minute and strain it)
a handful of French green beans
1 small carrot
1 small potato

Other ingredients
1/2 cup thick coconut milk
2 tbsp coconut oil
a handful of basil leaves
1 cup vegetable stock water
150 gm cottage cheese, cubed (you could use Tofu as well)
a handful of roasted cashew nuts (optional)

Method
1. Grind all the ingredients together, mentioned for the green paste. Keep it aside.
2. Boil all the veggies that you think needs it. You can skip capsicum. Also, don’t forget to save the vegetable stock.
3. Heat oil in a skillet. Once hot, add the capsicum. Roast it a bit.
4. Add the green paste, and cook it for 2 minutes.
5. Now, add the coconut milk and once it gives a boil, add the stock.
6. Throw in the veggies and basil leaves. Also, salt, if needed.
7. Lastly, add the cubed cottage cheese pieces.

Serve this fresh and nourishing Thai green curry with steamed rice.

Dear aubergine

20170319_134652 - Copy

The first time my mum gave you in my school lunchbox, I saw a live worm scrawling towards me just as I opened the box. I ran for my life in the corridor, promising not to touch or even look at you ever again.

It so happened that after my marriage, deciding the daily menu became the hair-pulling chore of my new life. My cook at the time in Mumbai suggested your name, and I shouted a no. She still persisted. I had to try you for her talent’s sake.

20170319_135157_001 - Copy

And you were wonderful. Your aroma was rustic and the smokey flavour was different than the usual dishes. Little did I know that I will fall for you at the first bite and you became a weekly thing then onwards.

It was on one Sunday morning, when I and my husband visited the farmer’s organic market here in Gurgaon. Just when we were stepping out of the place, I ended up at this stall that was selling clean potatoes and herbs. You were there, too. A woman picked you and asked the seller to check if there were no worms, and he passed it. I hadn’t tried any of you in the past few months, as the season wasn’t right. But it being spring, I picked you with pleasure and stuffed you inside my jute shopper bag.

20170319_140204 - Copy

I got you home, after which I roasted, peeled and cooked you with utter joy. Thank god for the spring!

And I was back with a mantra. I will never run away from you, my modest aubergine.

20170319_142935 - Copy

Recipe: Baigan ka Bharta/Roasted Aubergine

Ingredients:

1 medium-sized aubergine
1 onion, chopped
1 tomato, chopped
3-4 cloves of garlic, paste
1 green chilli, pound to paste
1 tsp of ginger paste
1 tsp turmeric powder
1½ tsp red chilli powder
1½ tsp coriander powder
½ tsp garam masala
½ tsp cumin seeds
A pinch of asafoetida
salt to taste
1 tbsp oil
coriander leaves, chopped

Method:

1. After washing the aubergine or eggplant, poke holes on it with a help of a knife. Put it on the stove and keep turning it from side to side, every minute. You want to cook it from inside, and from all sides. You might also have to make it sit for it.
2. After about 15-20 minutes of roasting, remove it onto a plate. After about a minute, start peeling it. Cut the top side and start cutting it length-wise. Here’s when you want to spot any worm, and make sure there isn’t one. If I see one, I don’t touch my kitchen counter for hours.
3. Meanwhile, chop your veggies and make a green paste of green chilli, ginger and garlic.
4. Take a pan, heat some oil in it. Once hot, add the cumin seeds and asafoetida. After a few seconds, add the other spices and quickly stir and add the green paste. Stir.
5. Throw in the onion and keep stirring. Avoid getting the spices stick on the pan.
6. Add the tomato and salt. After a minute of cooking time, start mashing the entire thing.
7. Next is the roasted aubergine’s turn. Mash it all well, and let it cook for about two more minutes. Keep stirring, as the spices tend to stick on the pan. (I hardly use any of your fancy non-stick pans; don’t mind my repeated mentions.)
8. Add the garam masala, and garnish it with coriander leaves. Unfortunately, I didn’t have any garnish that day. But it hardly mattered.