Amidst all the newfound food pictures and futuristic ways of serving ‘superfoods’ I see on Instagram these days, there is a room of my own that I want to constantly visit, and that’s my kind of food. Some place where my mum or a sweet neighbour in my native place gets me a warm plate of pear millet roti laden with ghee, radish sabzi, and a wee bit of red garlic chutney. You see, all the new styles of serving and eating food sometimes bewilder me as I find myself stuck to what I ate as a child.
Now, how do we actually create those childhood flavours from your mum’s kitchen alive again? You can’t. But I want to die trying. On hectic days that is most of my days, I’m too tired to cook for myself. When my cravings go unheard, I decide to shut all business and cook my heart out.
This chutney takes me back to my mother, who lives in a different state than mine. My mother did it all for us, but she certainly didn’t make us strong enough to live without her food; it’s our biggest weakness. But unlike my brothers, I don’t get to enjoy it whenever I want, so making her recipes in my kitchen does make me feel better. This is one such recipes that does that to me.
Recipe: Lasan ki chutney/Garlic chutney {Jaisalmer style}
Method: Grind garlic cloves and green chillies (more garlic of course). You can hand-pound it too. And, you can add a piece or two of dried red chilly to this as well (I usually skip it). Now, heat a pan. Add some ghee. Once hot, add in some asafoetida, turmeric powder, cumin seeds, red chilli powder (at least one tsp as you want your chutney to be hot), and coriander powder. Give it a quick mix and add in the ground paste of garlic and green chillies. Now, add in some salt, two tbsp of water (to cook the garlic), kachri powder (a regional ingredient found in Jaisalmer, Rajasthan; but you can skip it if you don’t have it), and a hint of mango powder. Now stir it every few seconds and once the water is all absorbed, switch off the flame. It’s best to be had with Bajri ki roti (pearl millet). Also, this will not go stale so soon; store it in the fridge and reheat it till the ghee melts well.
Next week, I shall be with her, and it’s going to be the best winter week, you guys. Family bliss, winter food and loads of cuddles are on my way. See you soon, Ma.
I often think how life is an on-going struggle; there’s something or the other that keeps on cropping up. I learnt the meaning of love firsthand from my parents. But did I see it as an easy thing? Unlike most of the couples where one of the partners succumbs to the issues, keeps mum, likes to sit in the corner babbling away, my parents are different. Both are extremely opinionated, have egos (at least in front of each other), like to speak up their minds, and rarely do they boast each other in front of people (yes, I have seen couples doing that a lot, not in my house though). These are the exact reasons why I love them, not because I’m their daughter, but as a human being too. Love is showing each other the real mirror so that no outsider can point finger at you. Love is keeping hope and being strong at all the times. The climb up the stairs is easy, but if you suddenly fall, that’s when it gets tough. When you sacrifice something important for the sake of your family and hold each other’s back, tight. I have seen my mother doing it umpteen times and it’s laudable what she’s done. Life with or without money is still easy, especially when you move towards prosperity and success slowly, step by step. The real test, however, is when you start losing it all. When you see people change around you. When there’s a long distance, literally, between you as a couple, and one of you have to keep the house chores going fine with whatever is in hand. Alone. My parents have survived that, and that is what makes them what they are to me. It’s easy to enjoy a simple life without any blots on your image, when you have nothing much to sacrifice, when you hardly give anything away that has your name on it. But these guys have stood the test of time, and have earned a solid rapport for facing the storm like a mountain.
But love can be tough too. There are times when you realise that the other person is not ready to change. There’s a certain way your partner might bring you down, and you just can’t do anything about it. You only have to accept each other, and keep going. Love can be so harsh at times as well. Your expectations go on a stroll forever, and you still have to keep holding each other so that nothing goes out of balance. And when I look at my parents, day in and day out, I see how love can be a complex thing too. It’s never easy, especially when the two of you have strong personalities, aspirations, a solid belief system, and the will to always do what you think is right. It’s tough then not to put your feet down.
But, here’s what I love, that is, when both of my parents are working in the kitchen. The other day, they had a small religious thing happening in our apartment. Mum had to cook something on urgent basis, and as usual, dad was with her in the kitchen, keeping his head down, helping her with whatever she said. So on the menu was moongfali ki chakki (a sweet dish made with groundnuts).
Mum had roasted the groundnuts, peeled and coarsely ground them and kept them in a jar during the day time. In the evening, when she felt the rush to go downstairs for the prayers of lord Ganesha, dad just stepped in out of nowhere. A usual scene this one. So, she started by boiling some sugar in water. If you have one cup groundnut, take a cup of sugar. Then, when the crystals were all gone, she checked the texture and consistency by using a big spoon. When one drop of the sugar solution fell off nicely, it was done. “Kya ab chaashni tyaar ho gayi?” I asked mum. She said yes. Now was the time to mix the groundnut that had been churned roughly (sift it quickly with your fingers to avoid any lumps) with the sugar solution. All three of us sat down where the platter was kept. Dad took the spoon from mum and mixed it the groundnut and sugar syrup well, slowly, making sure that it’s all done efficiently. Then, mum took the spoon from dad and scrapped off the skillet; meanwhile, dad spread the mixture on a big steel platter that was a bit deep, and tapped the platter on the floor ever so slightly. And it was ready.
A few minutes later, mum drew a few cuts on the groundnut chakki which was a little stiff by now. This was then transferred into a steel box to be offered to God and to be distributed later as Prasad among our neighbours who were supposed to gather on the ground floor.
But, just when she asked dad to keep the skillet in the sink, he almost crashed it there. There was a loud noise. Boom! And then mum mumbled a line that how he hasn’t changed at all. “Try to be careful for heaven’s sake,” she said to him. Dad gave a grin. There are some things you cannot change, right?
The second version was made with caramelising the sugar in a skillet. This time, there was no water added with the sugar. So dad stirred it continuously till it all melted. Once done, mum added the leftover groundnuts in it and quickly made a soft dough with a spoon. She had spread some melted ghee on the kitchen platform, on which she then spread the hot mixture and rolled it with a rolling pin. After a few minutes this turned stiff, and after some more time, when it was pretty stiff, she chopped it into bits. This was bonus to be enjoyed by the family only. The next day, mum made some chikki with whole groundnuts.
This is usually how last-minute savoury and sweet dishes are prepared in the kitchen, with a little rough moment in the end, when you just have to breathe deeply and get on with it.
That day, I realised it all again that love is an ongoing thing. And that you can never take each other for granted. Talking about my parents, they might not show their love to each other, at all, but it’s these little moments when I see them together and I know what the meaning of true love is.
With every season, you see different seasonal greens, fruits and veggies in the food market. You are supposed to change your kitchen ingredients, and eat local produce because they help you stay healthy by providing that nutrition punch that you need in that particular season. Talk about winter, and one of the things that was cooked in my mum’s kitchen was Hoole (होले). Called as Cholia in Delhi NCR area, or green chickpeas or green garbanzo beans worldwide.
Now, my issue was with its availability. I don’t buy pre-cut veggies from the market. So, when I saw these cleaned green chickpeas, packed in a plastic wrap, I totally refrained it. Cleaning these chickpeas is a process that makes sure that you’re having fresh green beans. And most vegetable vendors or grocery stores don’t keep the green bunches or half-cleaned Hoole. So, the other day, I was searching for them on my way, when we went to visit a local temple. The temple was closed before we reached there, but I was happy to see a man with a tiny cart, sprinkling water on these green bunches of Hoole. Both I and my husband smiled at each other, and bought 1.5 kg of it.
Green Chickpea Pulav
It’s a process, you see. It takes time and patience. So, we started cleaning these bunches and when we saved a cup of these green beans, we stopped and kept the bunch back in the kitchen balcony. For about three days, I did so, and ended up making three variants. That’s how I attained my wishes, as I knew, its season is going to end anyway.
So, the first batch went like this: my husband sat in front of the TV, and sweetly cleaned a cup of beans for me. I made green chickpeas pulav with this batch. The next day, early morning, I sat on the kitchen floor and cleaned a cup of Hoole. It took me more than 20 minutes. And I made some yum Parathas with it (stuffed thick rotis), and served it with fresh yogurt.
Green Chickpea Paratha
Yesterday, late morning, I cleaned one more cup of these green chickpeas but ended up eating most of it. And today, again, I sat on the kitchen floor (this time I spread a tiny mat or aasan) and cleaned another cup full of these young garbanzo beans and made some delicious Kadi (a buttermilk dish).
You know, I have always noticed my elders at home doing these kitchen chores in the calm morning hours. So, it isn’t a strange thing for me. Also, when you prep for a simple dish, you also kind slow down and learn to have patience in the process. On my recent trip to Indore, I noticed my uncle (JP Kaka; my father’s younger brother) do the same thing. And it inspired me.
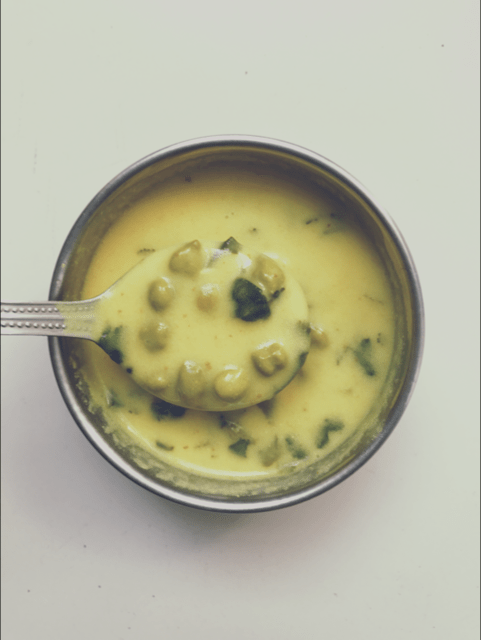
Green Chickpea Kadi
So, dear readers, here goes the three dishes that I made with Green Chickpeas or Hoole (so called in Rajasthan).
Recipe # 1: Green Chickpea Pulav
All right, so first, soak 1 cup of rice in water for 15 minutes. Make sure you clean the rice with water three times before soaking it. Now, take a kadai, add 2 tbsp oil in it and let it heat up a bit. Once hot, add in a bay leaf, ½ tsp cumin seeds, ¼ tsp or a few pinches of turmeric powder, and stir. Now, add in 1 cup of the cleaned green chickpeas. Stir for 30 seconds.
Next, add ½ tsp red chilli powder, ½ tsp coriander powder and sauté the chickpeas so that the spices coat it well. Add salt and ½ tsp garam masala. Now, strain the water from the rice bowl and add in the soaked rice in the kadai.
Here’s a thing. You need to roast this mixture for a minute or two, before adding water. After roasting the rice, green chickpeas and spice mixture, add in some water. I usually go with 5 to 6 cups of water. Will measure it next time. Close the lid and let it cook. After a few minutes, check if the water has boiled and if the rice is cooked or not. If needed, add in some more water.
Once you run a ladle or flat rice spoon in the bottom of the vessel to check if there’s no water, you can switch off the flame. Serve this pulav with hot Kadi or chilled Raita.
Recipe # 2: Green Chickpea Paratha
Take 1 cup of clean green chickpeas in a plate and mash it. Alternatively, you can also churn these green beans once, in the grinding jar. Or, steam these beans so that you can easily mash them.
After this, take a kadai, add in 1 tsp of ghee. Once it’s hot, add in cumin seeds, turmeric powder, cumin powder and coriander powder (all ½ tsp). Stir it for a few seconds. Now, add in the mashed chickpeas, and some salt. Cook it for a bit, and remove it into a plate to cool down.
Next up, take some whole wheat dough (salt and wheat flour), roll it into a round shape and add in some of this green filling. Cook this on a tava/griddle and roast it with 1 tsp of ghee. Serve with a cup of fresh yogurt.
Recipe # 3: Green Chickpea Kadi (buttermilk dish)
Take 2 cups of fresh, homemade yogurt in a large vessel. Mix 4 cups of water in it and blend it for about 30 seconds with the help of a hand blender. Now, we want an even/nice-textured Kadi. So, for that, you need to strain this liquid into another vessel. After this, add in 2 tbsp gram flour (besan) and whisk it lightly till you see no lumps. Add ½ tsp red chilli powder and ½ tsp of coriander powder, and keep it aside.
Take a Kadai (I use a steel one for this; gave up aluminium ones long back), and add in 2 tsp of ghee/clarified butter. Once hot, add in ½ tsp cumin seeds, ¼ tsp black sesame seeds, ½ tsp turmeric powder and sauté for a few seconds. Now, add in 1 cup of green chickpeas or you could also add ½ cup. Really doesn’t matter. Next, add the liquid gram flour mixture. Now, stir it quickly and continuously. Don’t leave the ladle whatsoever!
The key to a well-made Kadi is stirring it well. My mum used to temper the Kadi and give me the ladle to stir it for about 15 minutes or so, while she did other kitchen work. So, if you really want to make some good Kadi, with the perfect texture, you need to stir it. You can’t be restless and think of other things in hand. You just can’t. Forget every kitchen chore (I know it’s morning time, and you’re getting late to pack that lunch box) and stir the Kadi well.
After about 10 minutes or so, you can smell the aroma of the cooked buttermilk when you closely sniff it. Now is the time to switch the flame from low or medium-high so that the buttermilk can boil well. Stir it every 30 seconds now, and let it boil. After about 5 to 8 minutes, switch off the flame. Add in some chopped coriander leaves, and transfer the Kadi into a different vessel. This will avoid spoiling its texture. My green chickpeas cooked perfectly, thanks to the boiling process. Serve it with hot rotis/chapatis. PS. Have you ever sipped onto to hot Kadi? Once you make some Kadi, reward yourself like this: Take a bowl of Kadi, sit on the sofa, and sip it (with all the noises). You will truly love it!
I’m in absolute love the way my plants are coming back to life and blooming; especially the bougainvillea and lemon balm. And, this week, I went to art class without any sweater! It was such a great feeling to drive my two-wheeler without any jacket or muffler. Winters are almost gone. And I’m so happy the summer wave will hit us soon.
I have been listening to a lot of spiritual chanting tracks of late. Singing makes my heart weep, and I get really emotional when I sing these classic spiritual numbers, like the Ram Stuti written by Tulsidas, I believe. There is a nine-year-old girl called Sooryagayathri who sang a few lines from this Stuti and I downloaded it on YouTube to hear it again and again. Solace, I must say.
This year, I wanted to use more of pulses and lentils in my kitchen, and not stress only on vegetables. And this Monday, I happened to see this jar of coarsely pound split green mung dal. It then struck me that mum must have sent me this for Korme ki Roti. So I called her to know the recipe, and had it for breakfast. She always used to make Korme ki Roti for our travels and even for those hectic or slow holiday mornings.
Korma
Korma soaked in water
coriander seeds
Korma is nothing but slightly ground split green mung dal. Take a few cups of it in a jar, and grind it once or twice to get a coarse and slightly powdered texture. It’s made in Rajasthan, and is a common kitchen ingredient. You need to soak it for an hour before making this Roti. Also, I love the texture that coriander seeds in my Korme ki Roti. I’m used to eating the dry and slightly grainy Korme ki Roti since childhood, and it’s really filling.
So, if you’re looking for healthy breakfast recipes, you know what to try next. My mum used to make lots of Korme ki Roti and keep it wrapped in a muslin cloth in a Roti box for later. Perfect for those 4PM hunger pangs! I have to have something at 4PM; it’s dreadful for me when I find nothing to eat in the kitchen. So, a Roti box is a no else blessing.
Let’s make the dough! Oh, where is Korma?
Recipe: Korme ki Roti
Ingredients
wheat flour – 2 cups
spices (coriander powder, turmeric powder, red chilli powder) – as your preference
coriander seeds – 2 to 3 tbsp (coarsely ground)
Korma – 3 to 4 fists (soak it clean water before an hour; strain the mung flakes and water and then add it to the flour)
salt to taste
oil – 1 tsp (optional; we use it to make a tight dough)
bajra flour – 1 tbsp (optional; this makes the Rotis softer)
Method
1. Make a dough with all ingredients. But, be extra careful when you add water. Somehow, it’s extremely easy to bind these ingredients together and this dough takes less water. So, you can add ¼ cup of water, or may be less, initially. And then add more water, if required. After about five to 10 minutes, knead it for 30 seconds with a hint of oil to make it easy for you to roll the balls.
2. Now, just as we make rotis, you need to make one with a small ball of this dough. Roast it with a hint of oil or ghee on the griddle.
3. Serve your Korme ki Roti with mango pickle or garlic chutney. I love it with plain curd. And make sure you make some extra rotis for later.

 Amidst all the newfound food pictures and futuristic ways of serving ‘superfoods’ I see on Instagram these days, there is a room of my own that I want to constantly visit, and that’s my kind of food. Some place where my mum or a sweet neighbour in my native place gets me a warm plate of pear millet roti laden with ghee, radish sabzi, and a wee bit of red garlic chutney. You see, all the new styles of serving and eating food sometimes bewilder me as I find myself stuck to what I ate as a child.


")


